Friday, November 1, 2013

Defending my demo reel - How I started simulating cloth and hair

I can't believe I haven't made a post since February!  My how time flies!

I mention this a lot in person, but I don't think I've ever gone into how I got into hair and cloth simulation.

The TL:DR answer: I fell into it by complete chance.

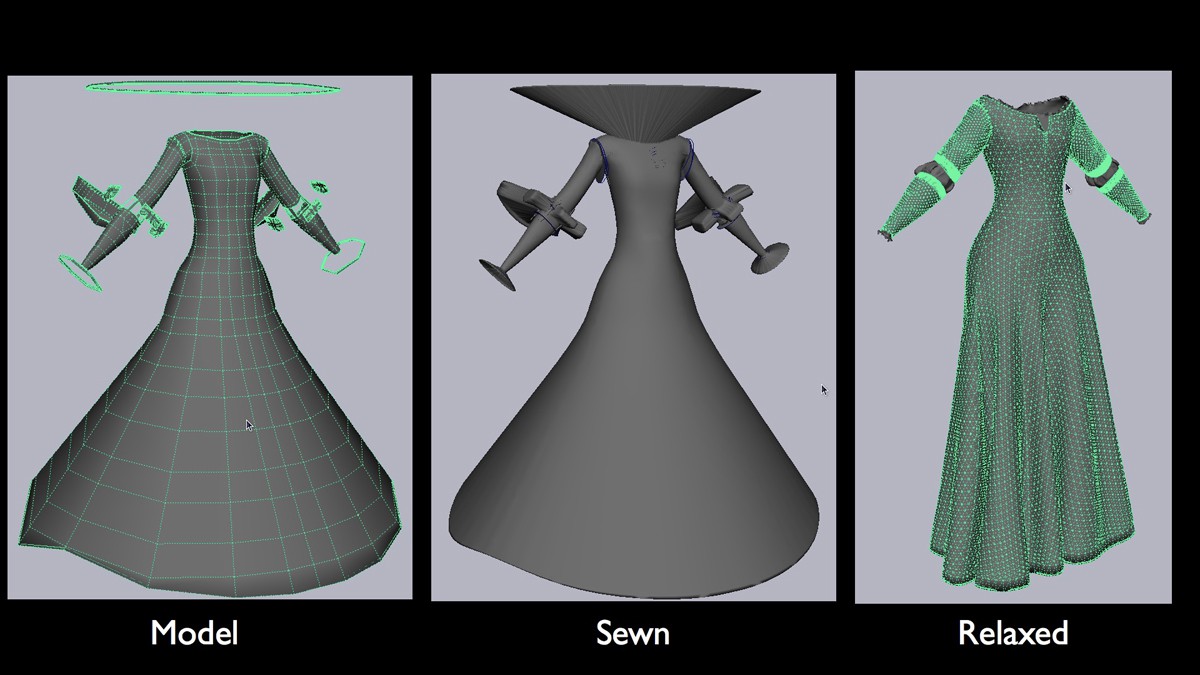
The thick of it is, on The Rock in the Road, the project that comprises 70% of my current demo reel, was an animation project that I worked on as a junior and senior.  I was an effects major and I wanted to learn how to do effects on the project, but the only effect needed was cloth simulation.  I didn't even know cloth simulation was a thing!  My introduction to nCloth was about 10 minutes and then I was told to do the cloth simulation on a shot.  It was an unmitigated disaster.  I had no idea what I was doing and the documentation available online was minimal at best and definitely not aimed at total beginners.  It was a humiliating, devastating process for me.  Unable to finish shots caused my grade in the class to plummet.  I had nothing to show while my peers were learning and completing all sorts of things.

This went on for an entire semester.

I was determined to have not wasted my time.  I was determined to figure this out.  During the summer, I was able to work on the project and I'd learned just enough to work on a shot, but during the entire summer I still didn't successfully finish one shot.  Early in the fall semester, they were finally approved.  I later found out that I had been struggling on two of the hardest shots in the entire short!  The next shot I was assigned, I finished in less than ten minutes.  The same for the next one.  And the next one.  And the next one.  After all of my sweat and tears, I'd finally gotten the hang of it.  I can't tell you how rewarding it was to have my teacher (a total genius and a total perfectionist by the way) approve my shots.  It felt so good!

I'd become addicted to the struggle.  Figuring out what parameters to change in order to get the cloth to behave a certain way was like working on a puzzle.  I love puzzles.  I love solving them.  I love how it feels when it's finally been solved too.  That's how I feel every time I work on a cloth shot, no matter how complex or simple it is.  The same goes for hair simulation, since the process is very similar.

I can't tell you how much I love what I do.

I'm still looking for a place to do it full time, but hopefully that'll come along at some point!

My demo reel hasn't gotten a LOT of attention, but many of the people who see it ask me a certain question quite often.  It's about the cloth in my reel, and why it seems stiff.

The answer to that:

During my struggles, I saw the midnight showing of Up.  Like Rock in the Road, the characters of Up have clothing that looks very thick.  Look at the main characters jacket for goodness sake.  Look at the thickness of his lapels and sleeves!  Cloth that thick wouldn't billow in the wind, that was my reasoning at least, and imagine how validated I felt when I saw how the cloth reacted in Up.  It was very understated, but very true to the model.  The end result just blew me away.  I loved it!

That was my intention in Rock and the Road.  It's not that I don't know how to make skirts flow and capes billow, it's that a 7 inch thick cape 'wouldn't' billow like an average cape would, in my honest opinion.  Sure it would move, just not a whole lot.  I'm proud of the work on my demo reel, and I hope to add more projects to it soon.

~Melissa


Monday, February 11, 2013

Python - Keeping things brief AND readable

I've always believed that clarity should trump brevity when it comes to scripting.  This is especially true of Python, since it's already so readable.  That's why some things I've written area little longer than they really need to be.  However, if I stumble across a way to keep things brief and readable, I try to use it as often as possible.

For instance, in Maya with Python this is how you check for a window and delete it if it exists:

if mc.window(winName, exists = True):
        mc.deleteUI(winName)

But you could do the same thing with less typing:

try: mc.deleteUI(winName)
except: pass

I also like to check the version of Maya that the user is using to avoid conflicts and such.  I like dockable UI's but versions of Maya older than 2011 can't support them.  So if the user has Maya 2011+, the will dock, otherwise it will float.  I've been doing it like this:


class ExampleClass():
  def __init__(self):
 
  self.dock = ""
 
         #Get the users version of Maya
  self.v = mm.eval("getApplicationVersionAsFloat")

  if self.v >= 2011:
  self.dock == True
  else:
  self.dock == False

But you can do the same thing with FAR less lines:


class ExampleClass():
  def __init__(self):

  #Get the users version of Maya
  self.v = mm.eval("getApplicationVersionAsFloat")
  self.dock = True if self.v >= 2011 else False

And it's just as readable.
EDIT:

When I deleted my dockControl, sometimes my window wouldn't delete.  By using a try, escape and else clause you can ensure that everything will be deleted if it exists in your scene.


import maya.cmds as mc
import maya.mel as mm

class ExampleClass():
  def __init__(self):
  self.winName = "exampleWin"
  self.v = mm.eval("getApplicationVersionAsFloat")
  self.dock = True if self.v >= 2011 else False

  self.exampleUI(self.winName, self.dock)

  def exampleUI(self, winName, dockOption):
  try: mc.deleteUI(winName + "_dock")
  except: mc.deleteUI(winName)
  else: pass

  exWindow = mc.window(winName, widthHeight = [300, 300])
exLayout = mc.rowColumnLayout()

  if dockOption:
  dockWindow = mc.dockControl(winName + "_dock", area = "right", allowedArea = "right", content = exWindow)
  else:
  mc.showWindow(winName)


~Melissa


Friday, December 14, 2012

Styling Hair Tutorial [External]

http://area.autodesk.com/tutorials/the_blue_project_skin_sculpting_and_hair_styling

There's a really great tutorial on Area that's been there for a while.  It briefly steps you through texturing a character in Mudbox, then gets into creating a hairstyle in Maya.  Please note that it's for Shave and a Haircut, not Maya Hair.  It's really great and worth the look if you're just getting started with Shave and a Haircut.

~Melissa

Friday, November 16, 2012

[Python] Getting an intField to only accept odd numbers

I know it's odd (pun!), but I needed to have an intField only accept odd numbers.  Initially, I'd done something like this:

import maya.cmds as mc def exampleUI(): exampleWin = mc.window() mc.columnLayout() testField = mc.intField(value = 63) number = mc.intField(testField, query = True, value = True) mc.button(label = "OK", command = lambda *args: exampleDef(number) ) mc.showWindow( exampleWin ) def exampleDef(number): if number % 2 != 0: print "It's odd! Yay!" else: print "Your number is even, prepare to die!"

If the value in the intField was odd, continue. If the value was even, error out and prompt the user to change it.  But it didn't do what I wanted, which was to force an odd number.  I didn't know if this was possible, but it sounded like it should have been.  I asked for help on the CGTalk Maya Programming forum and I learned two things.
Click here to see the thread

1) Use the intfield's changeCommand flag.  After the value in the field changed, it would run another block of code that would check whether or not the number was odd.  In the event it found an even number, it would either reset the value or increase the number by 1.

2) Another person agreed with the solution above and took it a step further.  He suggested this, and I think it's brilliant:

def setMyOddInt(integer): oddInt = integer/2*2+1 mc.intField('oddIntField', e=1, v=oddInt) def exampleUI(): exampleWin = mc.window() mc.columnLayout() testField = mc.intField('oddIntField', value=0, changeCommand=setMyOddInt) mc.showWindow( exampleWin )

I really like this bit here "oddInt = integer 2*2+1".  I wondered, why not just check to see if the number was even, and then say + 1 and return the new value?  You can do this and it will work but it would take three lines of code.  Here, it was done with one.

When you divide an int, most (if not all) languages will just round down to the next whole number.  Example, 3/2 will equal 1, not 1.5 (that would be a float, not an integer).

If we continue to use the number 3 as our example, 3/2 = 1.  Then 1*2 = 2 and finally, 2 + 1 = 3.  So you'd end up with your original odd number, 3.  But say we had an even number: 4.  4/2 = 2,  2*2 = 4 then 4 + 1 = 5.  See?  "integer/2*2+1", will always produce an odd number and this number will be placed into the intField automatically because of the changeCommand flag.

In the end, either way works.   As a side note, if you wanted to round down, you could just say -1 instead of +1.

Fun stuff.

I needed this for my hair script, which I'm converting to Python.  Hopefully I'll have more updates on that soon.

~Melissa

Tuesday, November 13, 2012

CGSociety Article - Rock in the Road

Rock in the Road


There's a really great CGSociety feature of Rock in the Road that talks about the road to starting and completing the project.  There's also a forum discussion if you're interested.  If you haven't already seen Rock in the Road, take a few moments and watch it.

~Melissa

Friday, October 19, 2012

Cloth - Level of detail

How much detail should your simulation mesh have?  When do you have too little?  When is it too dense?

That's a good question.

I saw this image a week or so before I went to SIGGRAPH:

It's one of Merida's simulation gowns from Brave.  I think they use a proprietary simulation software (it looks like some super variant of Qualoth to me), but look a the detail they have in the final mesh.  When I went to SIGGRAPH I was lucky enough to ask Claudia Chung (!!!) a question.  What are their simulation times like?  Did they have to wait minutes and minutes per frame, or was it a little faster?  She told me that if it was taking longer than a minute or two a frame, then something was very, very wrong.

For people with average computers like me, I show them this:


(click to view the original size)
Which one of these resembles your simulation mesh?

#1 Doesn't have enough information.  You can work with it, but it probably won't fold well over corners and you won't get nice billowing and wrinkling in your cloth.
#2 Is great and my personal choice.  Sim times are good, and you can get great detail (wrinkles, billowing as the character moves, nice overlap) out of it.
#3 Is too much.  If you have a fantastic computer, you might be able to pull it off.  Maybe.
#4 ... I hope your computer has a will.

I will say this.  Not every cloth object needs to have the same amount of detail.  If it's something that's not seen as much (like an underskirt), see if you can get by with less.  The same goes if your final cloth mesh is thick.  Thick cloth (like leather) wouldn't billow in the wind and fold in on itself as much as something thin (like silk), so you could probably get by with less detail.

EDIT:
Here's something else to keep in mind.

As a reader and colleague pointed out, the poly count of your mesh is also linked to how your simulation works, not just it's visual level of detail.  Take for example the four planes above.  The same settings wouldn't work for all four planes.  If you get the first one to work with a stretch resistance value of 30, the second one will probably need a stretch resistance value of 65 or 70 in order to behave, and so on and so forth.

~Melissa

Tuesday, October 2, 2012

Revisiting dockControl and Python classes

I hate floating windows with the passion of 1,000 red hot suns.  There was nothing I could do about it in version of Maya older than 2011, but now I have the ability to dock windows.  I talked about this in an earlier entry.

I've been watching a series of building UI's in Python by Jeremy Ernst that is just fantastic (and he hates floating windows too!  Yay!)  He uses the dockControl command religiously after video #4.  It's fantastic, but he never really mentions the fact that your script will error out if you use dockControl in a version of Maya that's older than 2011.  He does briefly touch on the fact that you can make docking true or false, but I thought I'd go ahead and share what I did.

If you're using Maya 2011 and higher, the window will dock.  If you're using Maya 2010 or lower, the window will float.

This may not be the most "efficient" way to do this, but it works.  If you know of a better or cleaner way to execute this, feel free to tell me.  I'm not offended if someone sends me an e-mail that says "idiot, you could do this in one line if---"

If you have no idea what the widgets dictionary in this script does, watch Jeremy Ernst's Building Maya Interfaces with Python video series, specifically video #6.  That's where he introduces it.

import maya.cmds as mc
import maya.mel as mel

class suitSuite():
    def __init__(self):
        self.widgets = {}
        self.winName = "suitSuite"
        self.dock = ""
        self.v = mel.eval('getApplicationVersionAsFloat')
        if self.v >= 2011:
            self.dock = True
        else:
            self.dock = False

        self.createUI(self.winName, self.dock)


    def createUI(self, winName, dock):
        #If Maya version is 2011 and above, create a dockable window, else create a floating window
        if dock == True:
            if mc.dockControl(winName + "_dock", exists = True) or 
mc.window(winName, exists = True):
                mc.deleteUI(winName + "_dock")
        else:
            if mc.window(winName, exists = True):
                mc.deleteUI(winName)

        self.widgets["window"] = mc.window(winName, title = "Suit Suite v. 0.1", width = 350, height = 500)
        self.widgets["mainLayout"] = mc.columnLayout(width = 350, height = 500)
        if dock == True:
            mc.dockControl(winName + "_dock", label = "Suit Suite v. 0.1", area = "left", allowedArea = "left", content = self.widgets["window"] )
        else:
            mc.showWindow(self.widgets["window"])


~Melissa

Monday, October 1, 2012

Python and MEL

I don't take full advantage of the fact that Python is an object oriented language.  I'm so used to the procedural MEL that I limit myself in Python.  I was writing a hair script in MEL and decided that Python would be better, but I ended up just writing it in Python the same way I'd done it in MEL.  After figuring out Python's classes and going back to my hair script... wow.  Classes make things so much easier.  I'm still muddling through, but I'm so excited.

I feel like a new world has opened up to me ^_^

~Melissa 

Thursday, September 20, 2012

Understanding Classes in Python

I love Python, but there are some things about Python that I've really been struggling with.  Mainly I'd been struggling with classes, __init__ and the use of self as an argument.  When I saw something like this:

class Introduction:
    def __init__ (self, name):
        self.name = name

I had a small stroke.  What does that mean?  What is the purpose of a class?  Why does "self" keep popping up everywhere?!  I just didn't get it, and every explanation I read was so technical and hard to understand.  Well, I'm an auditory learner so I went to YouTube to see if anyone had explained it.  When I heard this man's tutorial, everything clicked.  If you're having trouble like I was, I think you should take the 12 minutes to watch and listen to this video.


~Melissa

Wednesday, September 19, 2012

This is my life


I feel like this right now.

I hope that one day I'll make it, in the meantime I'll keep brushing up on my Python.  I love Python.  Once I get the hang of classes, I'll be unstoppable!

~Melissa